Electrifi FAQ
Electrifi Filament is a non-hazardous, proprietary metal-polymer composite that consists primarily of a biodegradable polyester and copper.
The relationship between resistance and resistivity is given by the following equation:
R= ρ L/(π(d/2)^2 )
Where: ρ: Resistivity constant of the filament, in Ω cm; L: Length of the filament, in cm; d: diameter of the filament, in cm2; R: Resistance, in ohms (Ω)
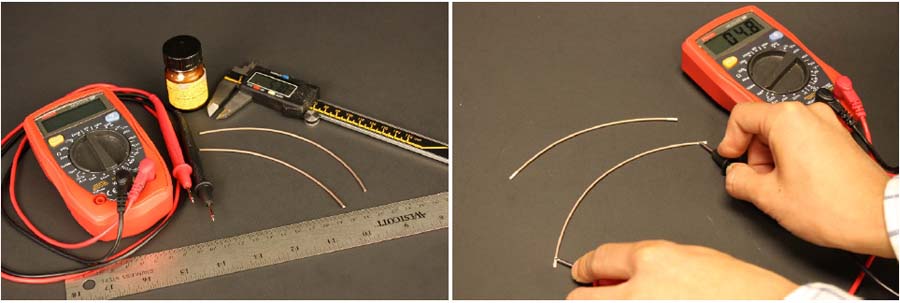
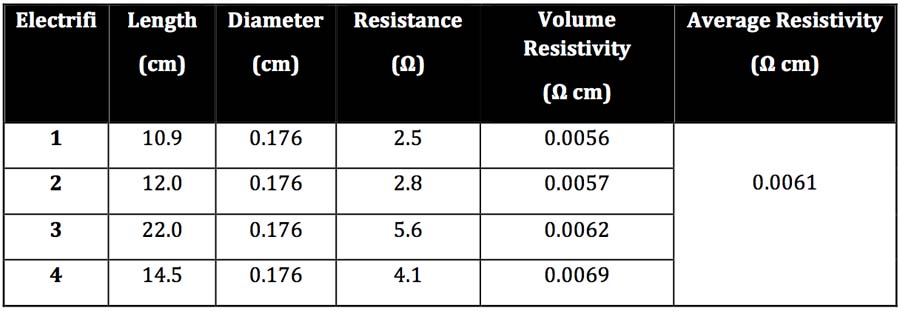
If you plug in 10 cm for the length, 0.176 cm for the diameter, and 0.006 ohm cm for the resistivity, you should get a calculated resistance of 2.5 Ohm. However, if you put your multimeter probes on the ends of a piece of Electrifi filament with a length of 10 cm, you will likely see a higher resistance. This is because of the contact resistance between the probes and the filament. To reduce (but not completely eliminate) contact resistance, we apply silver paste to the ends of the filament being measured. With silver paste, the contact resistance drops to about 0.5 ohm. We use the silver paste from Electron Microscopy Sciences, product number 12640. Once the silver paste is applied, it may take around 10-30 min for the silver paste to dry completely. We typically let it dry overnight for more accurate results. Now try again with the multimeter to measure the resistance of the filament. Make sure to press down firmly to ensure good electrical contact. Note that the resistance of your multimeter leads may also add a bit to the resistance of the measurement; touch the probes together to determine their resistance, and subtract this value from the measured resistance of the filament. The table below lists the results from four randomly selected pieces of Electrifi Filament measured in this manner, showing an average resistivity of 0.006 Ω cm.
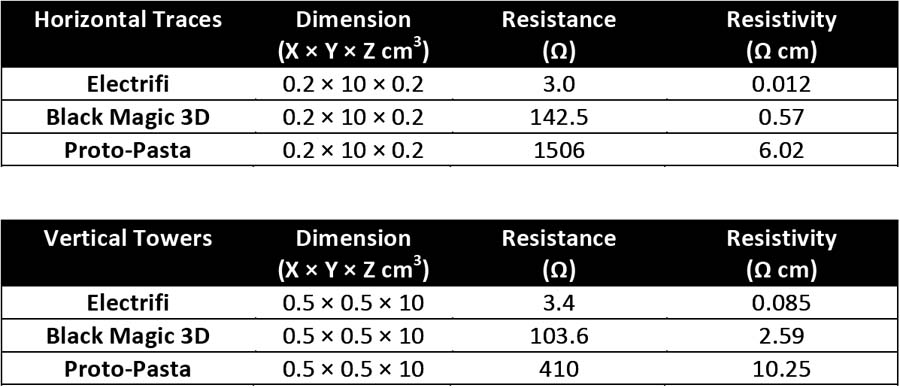
The resistivity of printed objects will depend on a number of variables, such as the details of the printed line (shell thickness, infill pattern, etc.) and the direction that you measure (between printed layers, along a line, etc). We printed 10 cm-long horizontal traces and a 10 cm-tall vertical towers with Electrifi and two other conductive filaments (Black Magic 3D and Proto-pasta) for comparison. See here for the stl file for this test. The traces and towers were printed at a temperature of 140 °C for Electrifi and 190 °C for Proto-past and Black Magic 3d, speed of 15 mm/s, a nozzle size of 0.8 mm, and a wall thickness of 0.7 mm. The results are shown in the tables below.
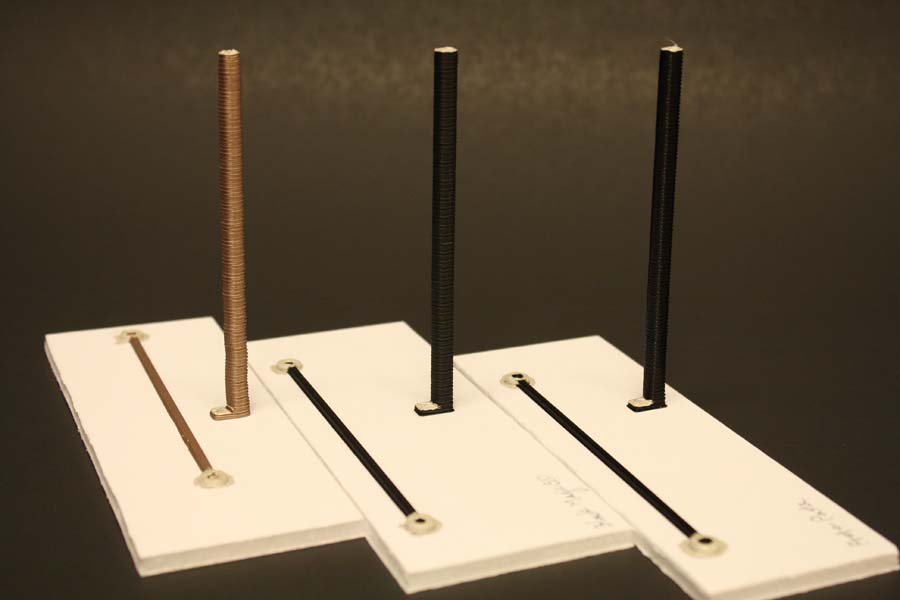
From left to right: Printed lines and towers of Electrifi, Black Magic 3D, and Proto-Pasta Filament.
Electrical contact between a wire and Electrifi Filament can be improved with silver paste, screw terminals, or a short piece of melted Electrifi filament. We usually use screw terminals without silver paste to form electrical contact between a wire and the filament. To compare these methods, we printed three identical traces (0.2 cm x 10 cm x 0.2 cm) and then applied silver paste, attached screws, or melted Electrifi filament on the ring terminals of each trace. If you want to print out this test trace yourself, you can download the stl file.We then measured the resistance between the two contacts with a multimeter on the silver paste, the screws, or the ends of the wires. As you can see from the table below, silver paste forms the most conductive contact due to is low contact resistance of 0.5 ohm, followed by screw terminals (which have a contact resistance of 2.4 ohm), and finally a melted piece of Electrifi.
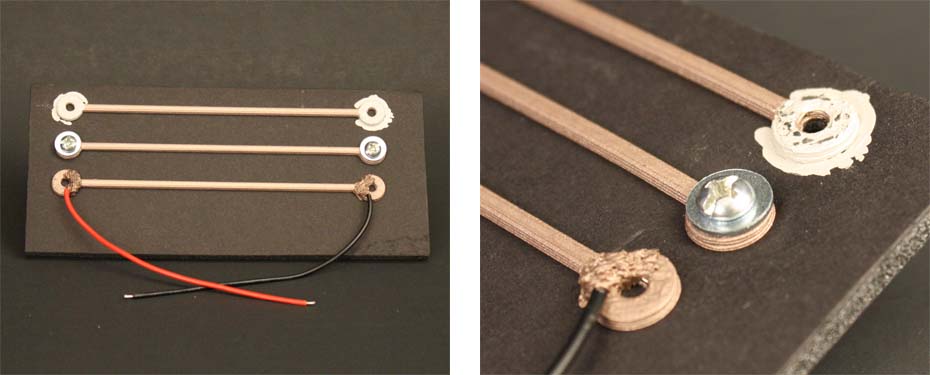
From top to bottom: silver paste, screw terminal, and melted Electrifi contact.

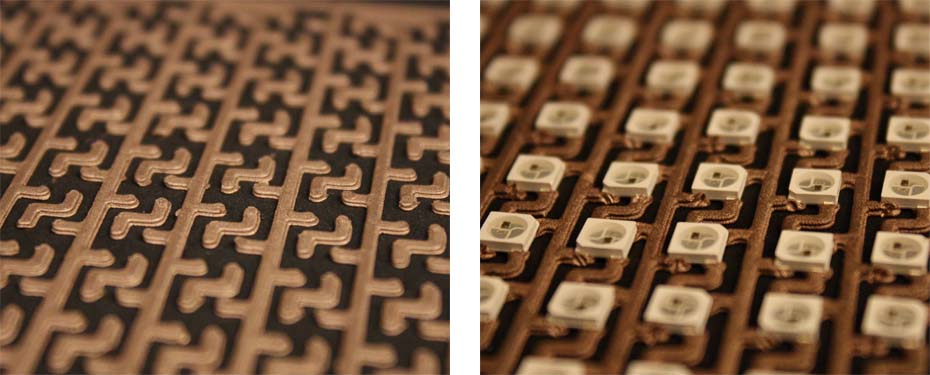
Place and align the leads of IC on the printed pads. Then heat the pads for a few seconds with a solder reflow tool at 100 °C, and press the IC directly into the pads. To ensure better contact with the leads, it may be necessary to add a bit of silver paste to the point of contact between the IC and the filament after pressing the IC into the filament.
 Left to Right: ATtiny sitting on the pads, ATtiny pressed into the pads, silver paste added at the point of contact with the ATtiny leads.
 There is no change in the conductivity after the printed traces (0.2 cm x 10 cm x 0.2 cm) are exposed in a room temperature environment (21 ± 0.5 °C) for at least a month. To accelerate the stability testing, a printed trace was tested at a temperature of 85 °C and a relative humidity of 85% for 24 hours. Under these very corrosive conditions, often used for accelerated testing of electrical devices, the appearance of the traces did not change and the resistivity doubled.

The best print speed for obtaining low resistivity with 1.75 mm Electrifi filament is between 15-45 mm/s. The table below shows the results for three print speeds for test traces 10 cm long, 0.2 cm wide, and 0.2 cm tall printed at 150 °C with a nozzle size of 0.8 mm and a layer height of 0.5 mm. As you can see, the resistivity is nearly constant over this print range.

The best print temperature for 1.75 Electrifi filament is 140 to 160 °C. The table below shows that for traces printed at print speed of 15 mm/s with a nozzle size of 0.8 mm and a layer height of 0.5 mm, there is a slight increase in the resistivity with increasing temperature.

The best print speed for obtaining low resistivity with 2.85 mm Electrifi filament is between 10-30 mm/s. The table below shows the results for three print speeds for test traces 5 cm long, 0.2 cm wide, and 0.2 cm tall printed at 130 °C with a nozzle size of 0.5 mm and a layer height of 0.25 mm. As you can see, the resistivity decreases with decreasing print speed.

The best print temperature for 2.85 Electrifi filament is 130 to 150 °C. The table below shows that for traces printed at print speed of 10 mm/s with a nozzle size of 0.5 mm and a layer height of 0.25 mm, there is a slight increase in the resistivity with increasing temperature.
 Note to the Ultimaker users: The heating blocks used on the Ultimaker printers are ~3 times thinner those used on most 3D printers. Therefore, a higher print temperature of 180 °C or above is necessary due to the narrow heating zone, resulting in a higher resistivity (e.g. 0.045 ohm cm) for a printed trace.
 To test flow rate, infill pattern, and shell thickness, traces were printed at a print speed of 15 mm/s and a print temp of 150 °C with a nozzle size of 0.4 mm and a layer height of 0.2 mm. The results below indicate that a flow rate of 110% and parallel infill results in slightly better resistivity. Printing at a lower flow rate results in objects that are not 100% filled, especially for the zig-zag infill pattern. Depending on the slicing software, it may be possible to adjust the infill pattern. In Cura we did this by adjusting the wall thickness from 0.4 to 0.8 mm, which changed the infill from a zig-zag to a parallel pattern. The parallel pattern is slightly better, likely due to better continuity and fill along the line.
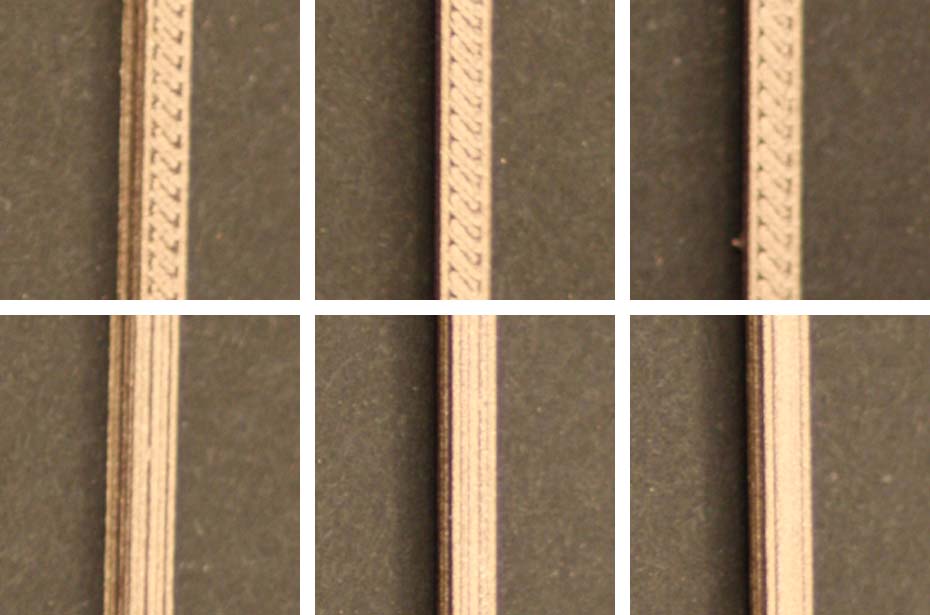
Zigzag on the top (left to right: 100, 110, 120% flow rate); parallel line on the bottom (left to right: 100, 110, 120% flow rate)

Vertical towers (0.5 cm x 0.5 cm x 10 cm) were printed at two different layer thickness with 0.4 and 0.8 mm nozzles, respectively. The print speed was 15 mm/s and print temp was 140 °C for both towers. The results shown in the table indicate the tower with smaller number of layers has a lower resistivity.
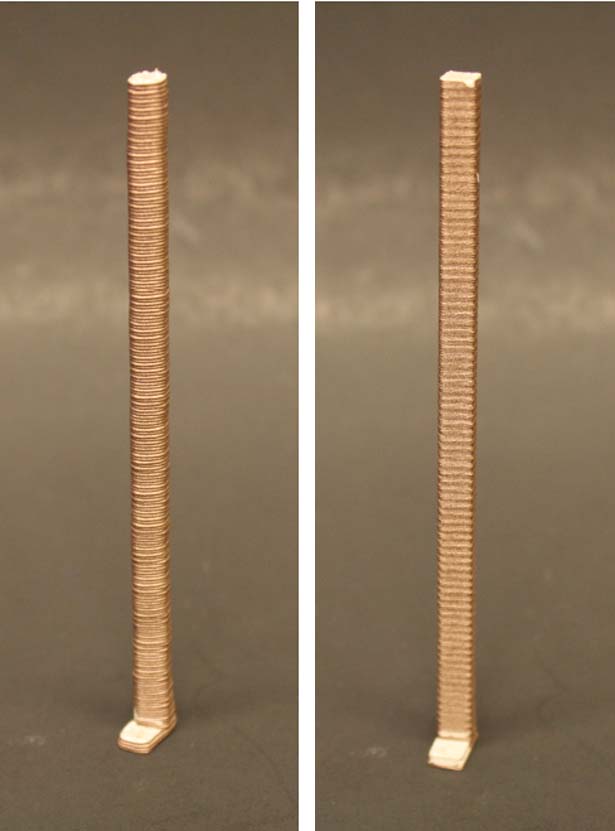
Left:200 layers with a layer height of 0.5 mm; right:500 layers with a layer height of 0.2 mm.

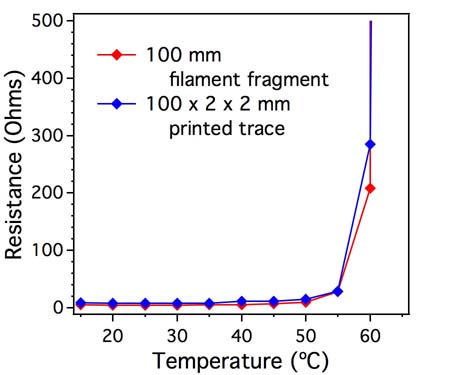
The melting point of Electrifi Filament is approximately 60 ºC. Below we shown a plot of resistance versus temperature for the Electrifi Filament. As you can see, once the filament reaches its melting point the resistance increases dramatically.
The MSDS for Electrifi Filament is available here: Electrifi_MSDS
Contact, Payment, Shipping and Returns
Our preferred method of contact is via the contact form on our contact us page. We respond to most messages within 24 hours.
We accept all major credit cards through the Square payment gateway. If you need to do a direct bank wire transfer instead, we are happy to provide you with an invoice with our bank information.
Most orders ship within 24 hours of order placement. For domestic orders, we ship USPS priority mail for $8.80. The USPS says priority mail should arrive in 1-3 business days. For international orders, we ship UPS Worldwide mail and it should arrive in 5-7 business days.
If you are shipping to a country other than the U.S.A, you may need to pay customs, taxes, clearance duty or other extra fees at the time you accept the package. We don’t collect the fees when you place the order, and it’s your responsibility to pay these fees as the consumer. It’s also hard for us to predict what they might be, but you can use a tool like this duty calculator to get an estimate. In this quick tool, a product description such as 3D printing filament or an HS Code (e.g. 3916.90.30) is needed in order to generate the rough Duty Rate and VAT Rate.
We want you to be 100% satisfied with our products. If you are unhappy with any product ordered from us, please let us know as soon as possible and we will do all we can to correct the situation. If you would like to return a product, please ship it back to us within 30 days of receipt for a refund. We unfortunately cannot reimburse the cost of return shipment. To arrange for a return, please contact us. Important Note: It is your responsibility to pack the returned product appropriately and with enough protection so that it arrives undamaged. We will not be able to refund any products that arrive damaged to our location.
